Volkswagen Caddy Diagnostic With The Autel MaxiCheck MS906 Pro
When it comes to performing vehicle diagnostics on a professional level, one needs a reliable and capable machine that can carry out various tasks and solve various problems/faults that may come up.
While many car diagnostic machines are capable of performing a scan and some service functions, they may not be capable of doing more special tasks such as coding, adaptation, and solving complex tasks. That’s where the Autel MS906 Pro comes in handy.
In this article, we are going to demonstrate the diagnostic functions, along with hot functions and some auxiliary capabilities of the Autel MS906 pro. Using a 2014 Volkswagen Caddy as our vehicle of choice.
A quick introduction to the Autel MS906 pro
The MS906 Pro is a compact 8-inch Android-based tablet that uses the powerful MaxiSYS diagnostic software, with the ability to read and erase codes, view freeze frames, data graphs, live data, and perform active tests on all available modules with adaptation and coding capability.
The MS906 Pro boasts with over 36 service functions and covers over 90% of vehicle manufacturers worldwide. With the service functions, you can do your service light reset, abs reset, as well as airbag reset among other service functions. The MS906 Pro is extremely versatile and it can also be used for ADAS calibration, TMPS, Injector coding, and more.
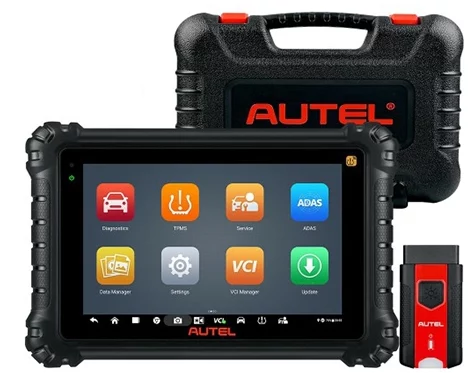
The MS906 Pro tablet is wrapped in a strong rubber case and features two heat sink outlets, a collapsible stand, and a built-in camera for easy VIN detection at the back.
In the carrying case you will also find :
- A wireless Bluetooth-enabled VCI 200, which connects the machine to the vehicle
- A 12V Charging adapter
- 1x USB-C cable for data transfer to your computer
- 1x USB to Ethernet adapter
- 1x cigarette lighter adapters as well as 2x spare fuses
Getting started
Before engaging with your diagnostic machine, please make sure that your vehicle is secured and parked.
- Start by locating the vehicle’s OBDII port. In most vehicles, the OBDII port is located below the dashboard on the driver’s side.
- Proceed to Insert the VCI200 into the designated DLC (Diagnostic Link Connector) also known as the OBDII port.
Wait a few seconds for the light on the VCI to flash, along with a beep sound from the tablet, this will indicate that the machine is properly connected and is ready for use.
Turn the car ignition onto the ON position, but do not start. This will allow the MS906 pro VCI to connect to the vehicle’s system.
Auto VIN selection and Vehicle Identification
From the main menu, select diagnostics then follow by selecting VIN , which is located at the top left corner of the screen. Follow by tapping on auto-detect, and the machine will attempt to automatically detect the vehicle’s VIN Number directly from the ECU.
Auto VIN detection is not always available on all cars, if the machine fails to automatically detect your vehicle’s VIN, you will need to manually insert it.
You can find your vehicle's VIN on the vehicle's license/registration disk located on the windshield, or on a stamped plate that can be placed in various locations such: On the dashboard near the windshield, on the driver's side of the vehicle, On a plate or sticker on the driver's side door jamb or stamped on the engine's firewallFull system scan
Once the machine has successfully decoded the VIN information, proceed to select your vehicle’s make and test type. In this case, we are going to select stand-alone diagnostics, which will then be followed by the vehicle’s engine selection.
Once you have selected your vehicle’s engine, tap okay and the machine will load and automatically open the diagnostic function, where you have the choice of testing several functions shown in the image below
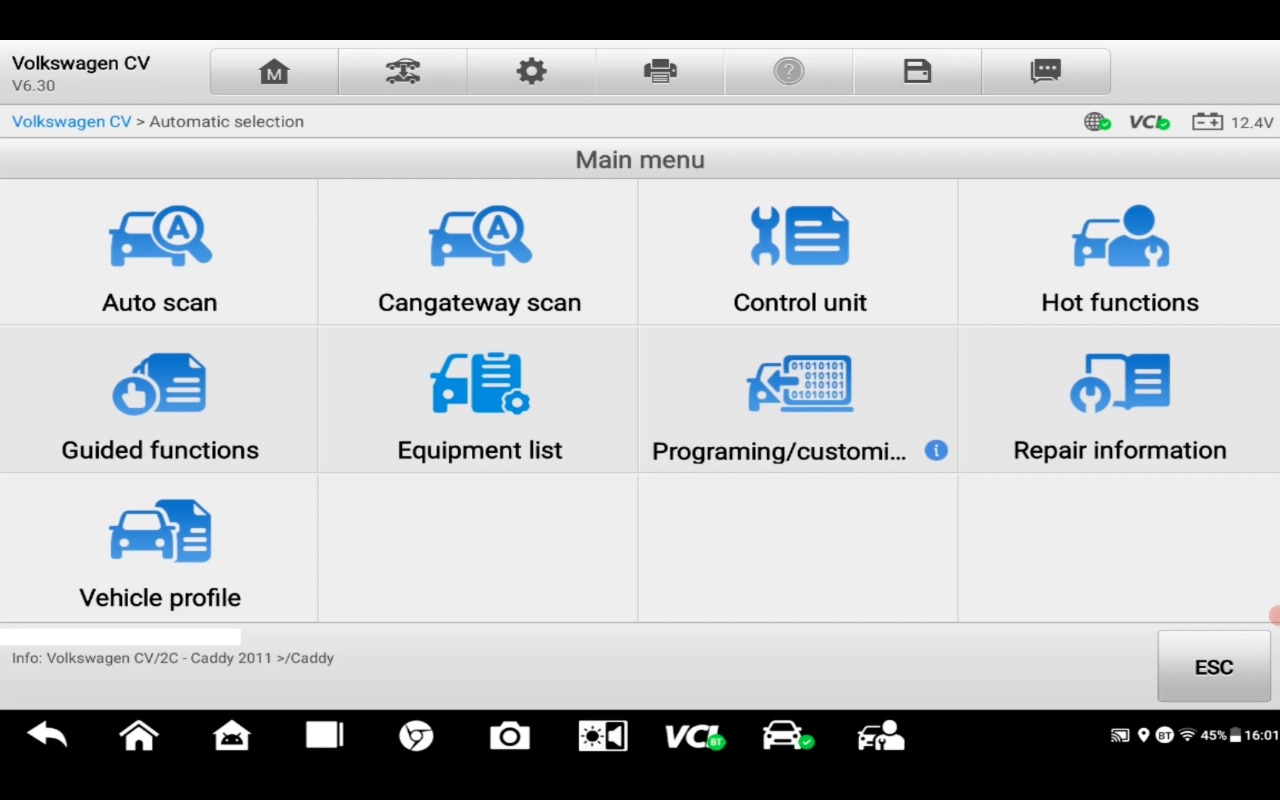
Full system diagnostic scan
To perform a full-scan of your vehicle modules,
Select Auto-Scan and the machine will begin to automatically scan all the available modules in the vehicle.
Note: this process may take a bit longer because the machine will scan all the modules available on the vehicle. So, please be patient.
After the auto scan has been completed, The Autel MS906 Pro detected a multitude of faults.
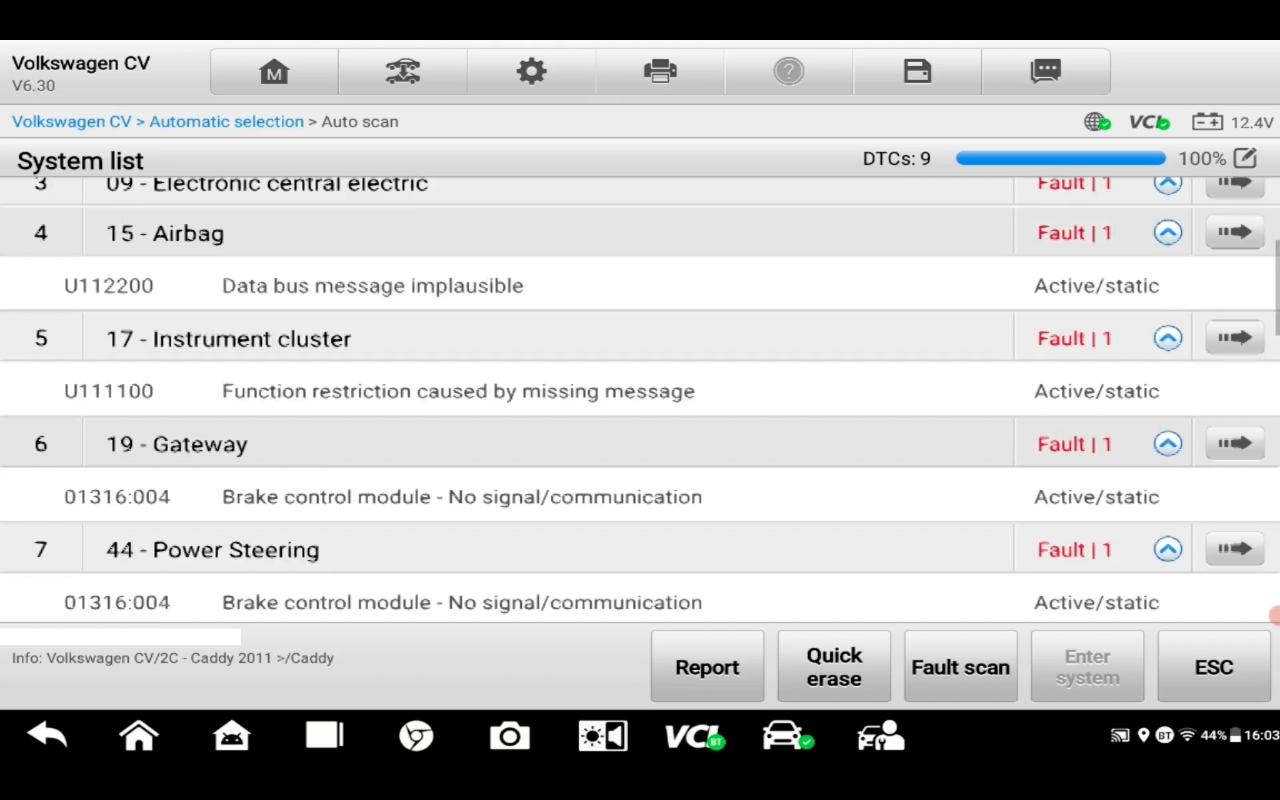
After reading and assessing the faults codes. We carefully troubleshooted and we concluded that they all had one issue in common which resulted in having a blown fuse.
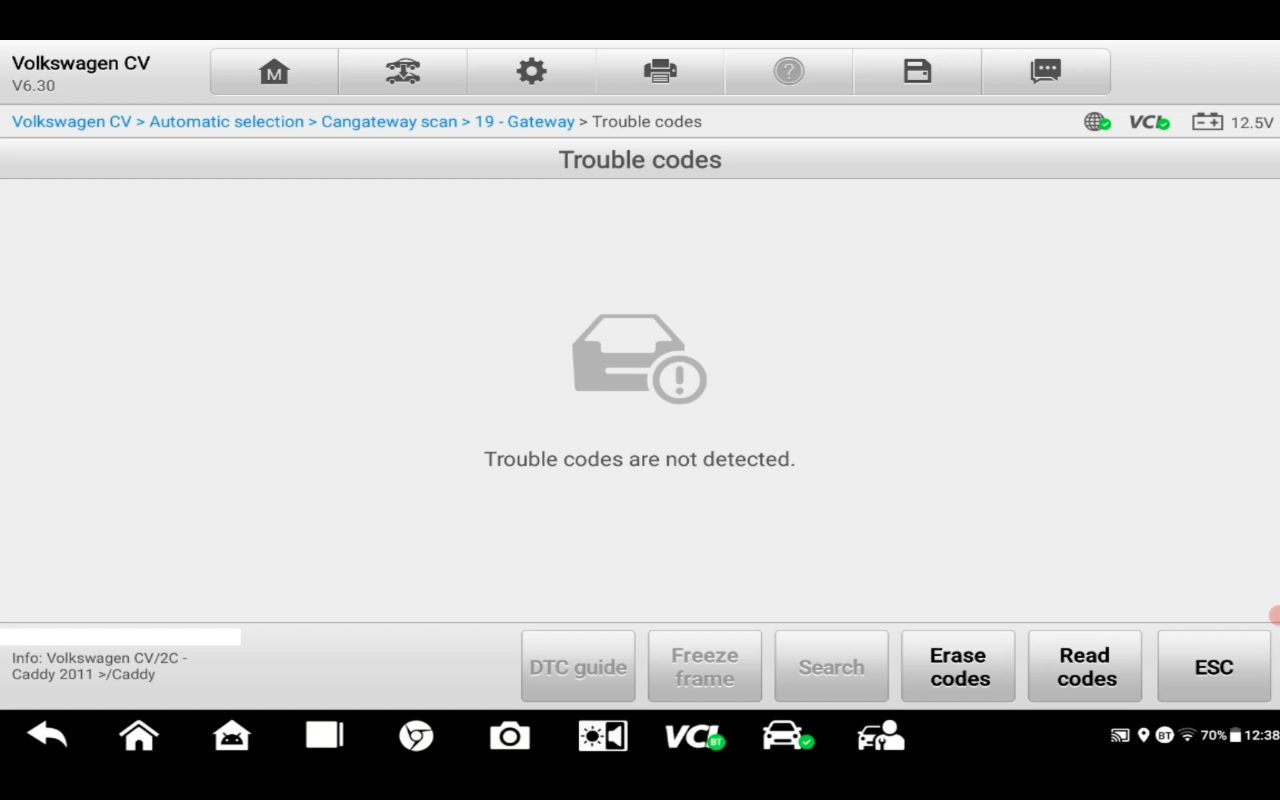
After replacing the blown fuse in our case. If you have replaced the damaged component or parts. You will need to re-scan the modules to make sure that the fault code has been cleared. If you have correctly replaced the damaged component, the previous fault cost will turn green/pass after the re-scan.
Gateway coding
After replacing the blown fuse and re-scanning the vehicle, one module failed to clear.
Stating “Gate way” error of an incorrectly coded module.
To clear this gate way error, proceed by tapping on the right arrow next to the fault.
The machine will redirect you to the function menu.
- Select gate way installation list. Where you will find the cause of the fault. In our case, the trailer function was not coded.
To resolve this error, proceed by selecting “setting code”
- Select the coded status, then press ok
- The trailer function’s status will show “coded”, proceed by pressing execution code
After the machine has initialized the code, tap on “ESC” to return to the function menu, where you will proceed to erase the code by going to “trouble codes” and then selecting erase codes. And finish by following the steps on the screen.
Diesel Particular filter regeneration
Amongst many of the service functions available on the MS906 pro, the diesel filter regeneration stands out when it comes to servicing Diesel vehicles which often require their DPF filter to be cleared. To use this function,
- Select hot functions from the main menu
- Tap on The particular folder. So we would go into hot functions and select the DPF of the treatment.
- Select DPF
- Select particular filter service regeneration.
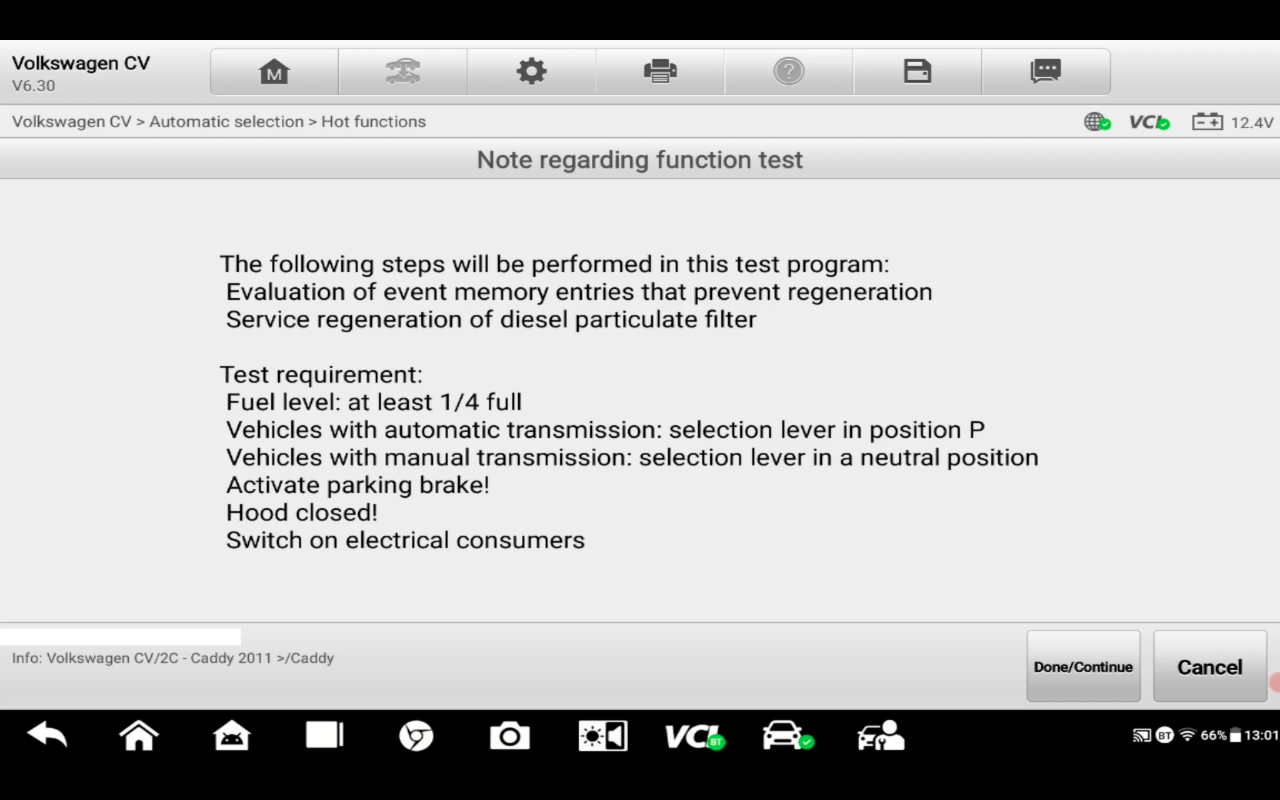
You will then get a notification on the screen stating which steps to follow to regenerate the diesel particular filter. Carefully read the instructions and follow all the steps as stated on the screen.
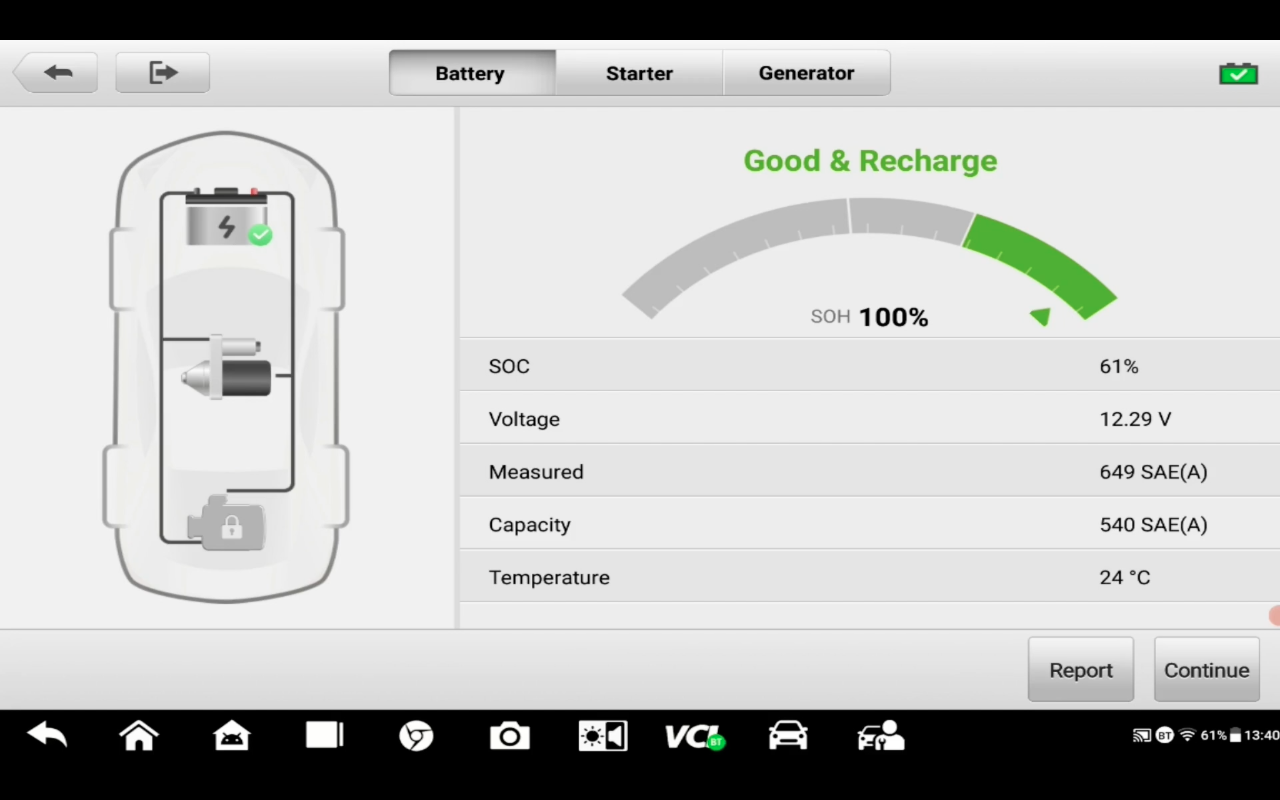
In vehicle Battery Testing
An added benefit of using the Autel MS906 Pro is its ability to perform battery testing, using a wireless battery add-on from Autel, The MaxiBas BT506, which connects to the MS906 Pro via Bluetooth.
To connect the Autel MaxiBas BT506 to the MS906 pro,
Start by switching the BT506 on by long pressing the power button.
Once it has been switched on, select the VCI Manager icon on the MS906 pro, then select BAS BT, which will be automatically detected and pair it to the device via bluetooth.
Once the BT506 has been paired to the MS906 pro, return to the home menu and select the battery testing icon.
The BT506 paired to the MS906 Pro can perform both in-vehicle and out-vehicle battery test.
For in-vehicle testing, connect the BT506 cables to the respective terminals of the battery with red on the positive and black on the negative.
Proceed to follow the steps as shown on the screen to correctly test your vehicle’s battery.
Digital Scope Inspection
In the list of add-ons, the MS906 Pro is compatible with the USB Digital Inspection Camera from Autel, the MV108 which can be used to perform inspections in hard-to-reach areas, such as bore inspection inside the engine’s cylinder.
In order to use the Autel MV108 digital inspection camera, simply connect the USB cable to the available USB port found on top of the tablet. Once the USB cable of the Scope has been connected,
a light at the end of the scope will light up to indicate that the device is ready to be used.
Next, proceed to the Maxi video icon on your tablet where you will be able to see a live video feed coming from the MV108 scope.
Voila! Just like that, you have made it to the end of our blog.
We hope that this article has been insightful and has provided you with enough information on how to perform a full system diagnostic along with other notable functions of the Autel MS906 Pro on your vehicle.
If you enjoyed this article, make sure to subscribe to our newsletter to stay updated on our latest blogs as well as our latest product additions and deals.
Also, if you would like to watch our step-by-step video, make sure to subscribe to our YouTube channel to stay notified of our news videos.
We at autosupply have a wide range of car diagnostic tools, as well as other car-related products, make sure to visit autosupply.co.za to browse through our product range and find all the products mentioned in this article.
FAQs
Did you know that you can finance your Machine?
Visit our Finance options, to see which fits you best. Click here
Q/ How to update the Autel MS906 pro
A/ The Autel MS906 Pro can be updated online, after purchasing your update through autosupply, please follow this link for more information. Click here
Q/ Can you do battery testing with the MS906 pro?
A/ yes, you can. You can do battery testing on the MS906 pro, by adding the Autel MaxiBas BT506, which connects wirelessly to the MS906 pro via Bluetooth.

