Autel Maxicheck MX808 Full System Car Diagnostics, Nissan Micra
With the increase of electronic components and computers in modern cars, a car might often experience a technical issue that can not be easily diagnosed manually. That’s where a car diagnostic test helps the mechanic or owner of the vehicle to identify issues that are often not visible to the naked eye. These issues can range from, wrong engine timing, faulty fuel injectors, faulty sensors, and more.
To perform an accurate diagnosis of a vehicle, one needs a reliable and capable machine to help pinpoint, and exactly determine the cause and location of the fault. Whilst at the same time being able to rectify it before the problem escalates.
In this article, we are going to take you through the essential steps needed to perform a full system diagnostic, using the Autel Maxicheck MX808. For this test, we picked a 2010 Nissan Micra (K13) as our chosen vehicle for demonstration.
First, a quick introduction to the Autel MaxiCheck MX808
The Autel MX808 is an advanced, compact, and powerful all-system car diagnostic scanner with a user-friendly interface. It features a 7-inch touchscreen display and uses an android-based operating system, (Android 4.4.4 KitKat). It’s the ideal diagnostic machine for a professional car workshop/service center, thanks to its wide range of vehicle coverage of 80+ car makes and models worldwide (1996 and newer).
The MX808 boasts a lot of powerful and useful functions, here are some of the notable key functions:
- Reading fault codes with the specific description
- Clearing fault codes
- Auto VIN generation
- Access to Live data
Not to forget the 25+ hot service functions such as:
- Read and clear code for all available systems
- Reset service light
- ABS bleeding
- Relearn parking brake pad after replacement
- Support battery registration and reset and much more
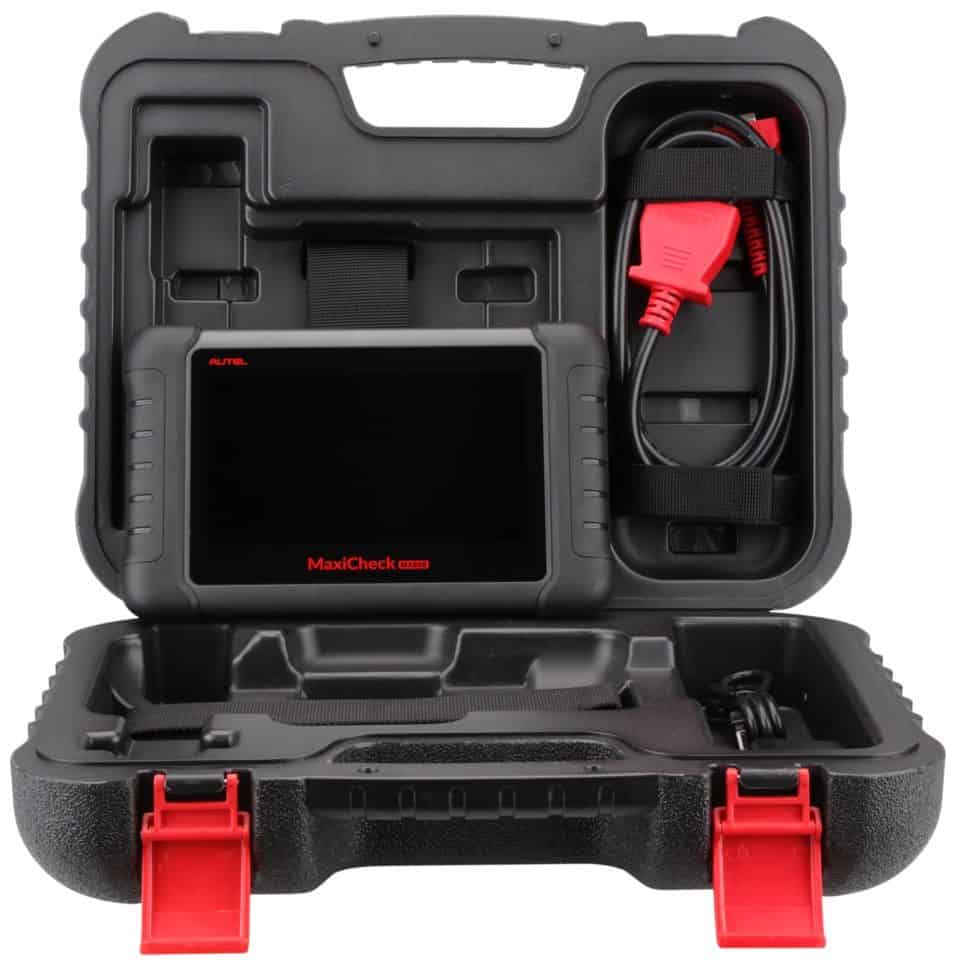
The Autel MX808 Kit contains
- MX808 Tablet
- 1x MX808 OBD II Cable
- 1x mini USB cable, Connects the tablet to the PC or DC external power adapter.
- 1x Power adapter
- Carrying case
Getting Started
- Locate the OBDII port on your vehicle. In most vehicles, the OBDII port is located below the dashboard on the driver’s side.
- Insert the OBD II connector into the designated DLC (Diagnostic Link Connector) also known as the OBDII port. Wait a few seconds for the light on the tablet to flash, this indicates that the machine is connected and is ready for use.
- Turn the car ignition onto the ON position, but do not start. This will allow the MX808 OBD II cable to connect to the vehicle’s system.
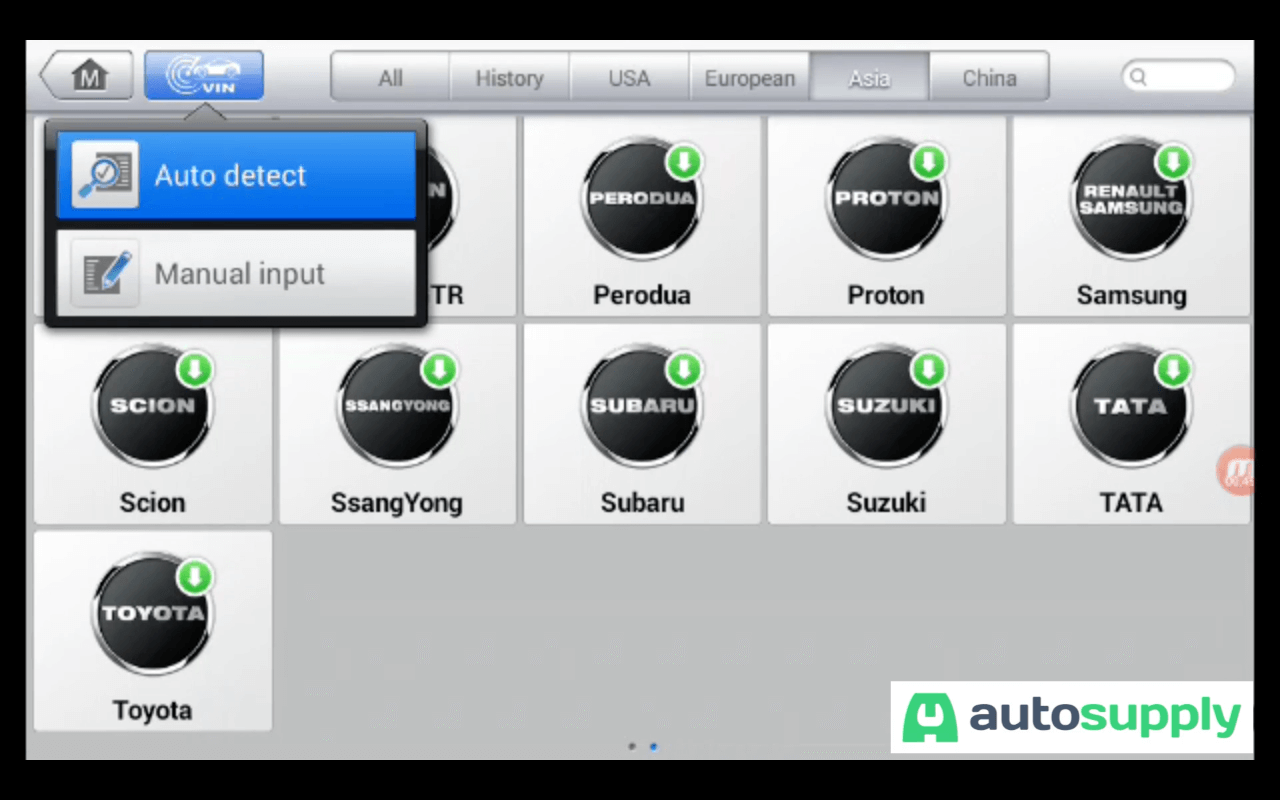
Auto VIN Detection and vehicle identification
From the main menu, select diagnostics then follow by selecting Vin, which is located at the top left corner of the screen. Follow by tapping on auto-detect, and the machine will attempt to automatically detect the vehicle’s VIN Number directly from the ECU.
This process can take up a few seconds depending on the vehicle.
During our test, the machine failed to automatically detect the vehicle’s VIN number. This does happen occasionally depending on the vehicle brand. But the majority of the South African vehicle brands are auto-VIN capable via their software.
Manual Insertion of the Vehicle's VIN number
If the Auto Vin detection fails, you will need to manually insert the VIN number of the vehicle so that the machine can be able to connect with the vehicle ECU.
Where to find your vehicle’s VIN number?
You can find your vehicle’s VIN on the vehicle’s license/registration disk located on the windshield, or on a stamped plate that can be placed in various locations such:
- On the dashboard near the windshield, on the driver’s side of the vehicle.
- On a plate or sticker on the driver’s side door jamb.
- Stamped on the engine’s firewall
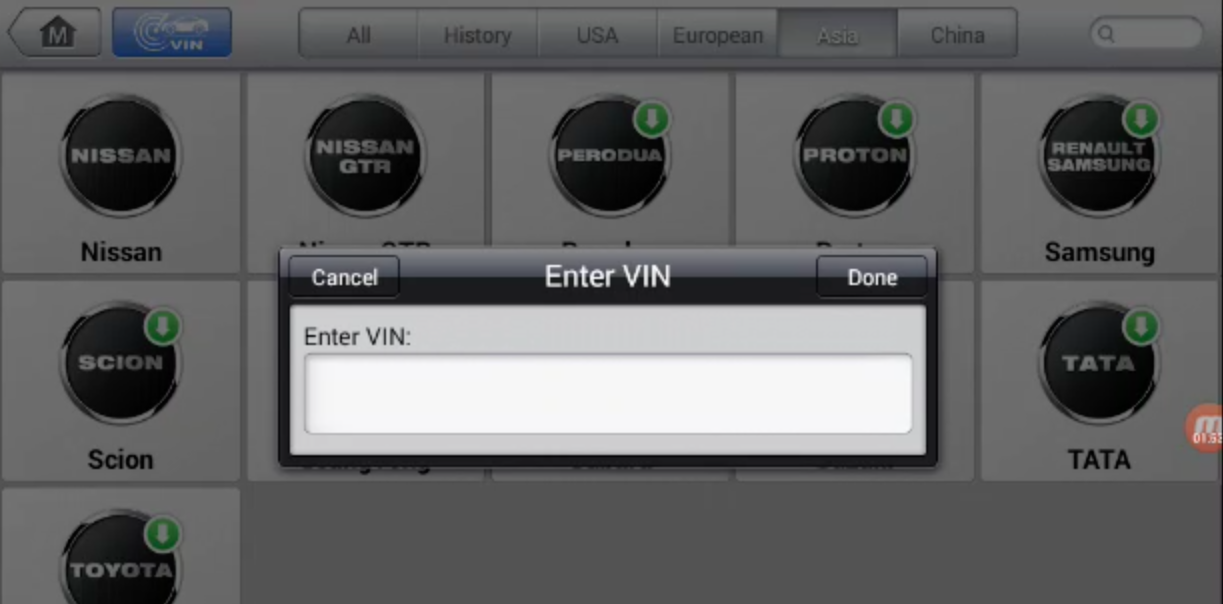
Once the vehicle’s VIN has been found, return to the main menu by pressing the return button, then select VIN once again. This time, proceed by selecting “Manual input”. Carry on by manually inserting the VIN using the on-screen keyboard and pressing enter to initiate the scan.
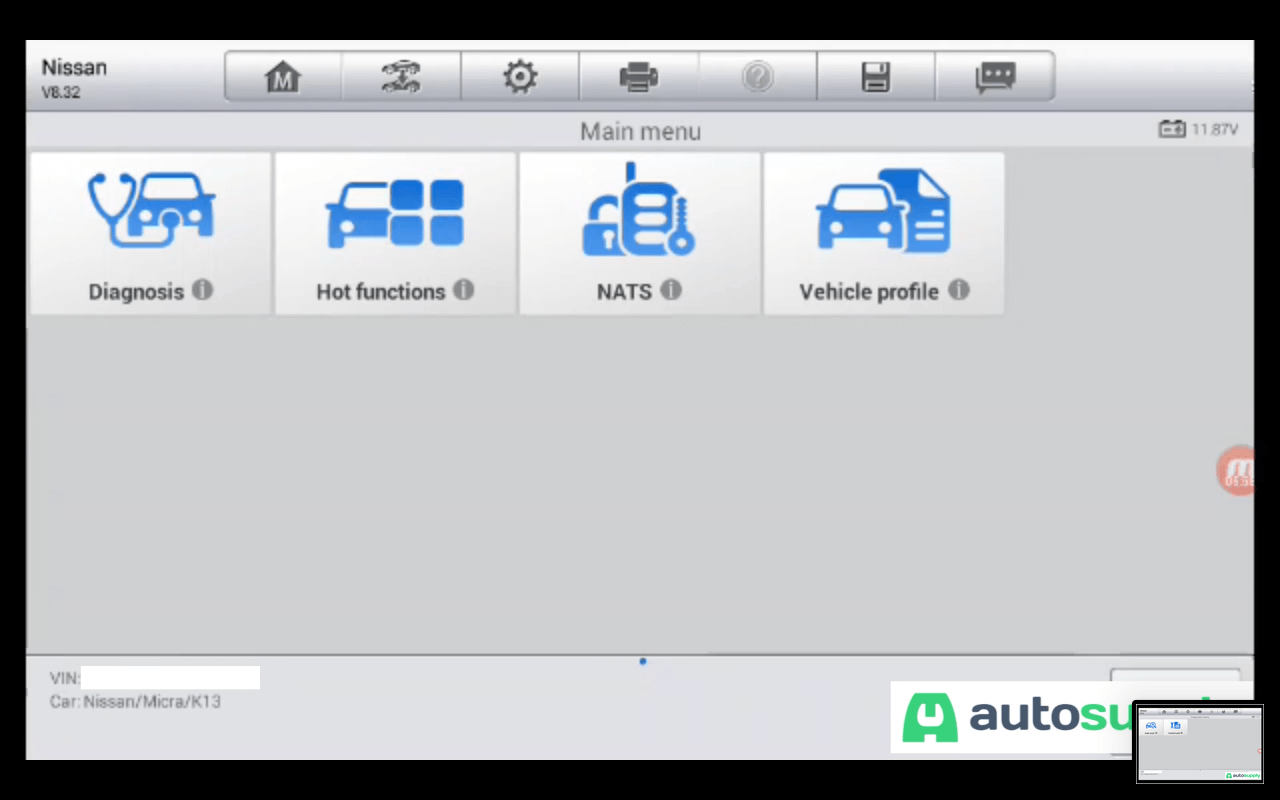
Once the machine has successfully decoded the VIN information, it will automatically open the diagnostic function, where you have the choice of testing several functions such
- Diagnosis
- Hot functions
- NATS
- Vehicle profile
For our test, to scan the different modules available in our vehicle, we will have to choose Diagnosis. Click on “Diagnosis”, and continue by selecting auto scan, whereupon the machine will begin to scan all the modules of the vehicle to detect any error or faults codes.
If the machine does not detect any error codes, proceed by pressing ESC, to exit the diagnostic menu.
Individual module scan function
If you would like to scan an individual/specific module of your vehicle, you can do so with the Autel MX808. Simply select “Control Unit” on the diagnosis menu, and the machine will display the available modules depending on the vehicle you are testing. This function helps speed up the diagnostic test by focusing solely on one module at a time, which makes the diagnostic process a lot quicker.
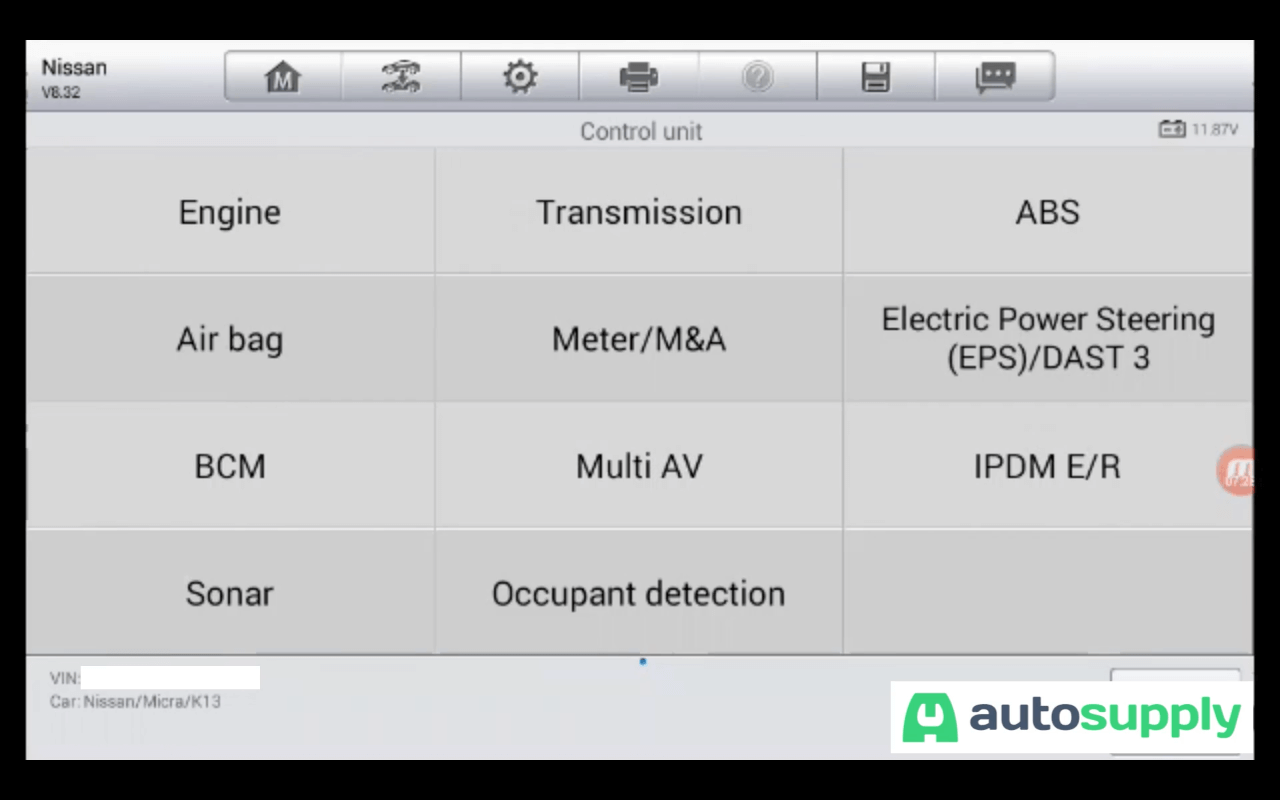
As you can see in the image above, the Nissan Micra has 11 available modules, which can be individually scanned.
To scan each module individually, proceed by selecting the module you would like to scan, in our case, we chose to scan the engine module.
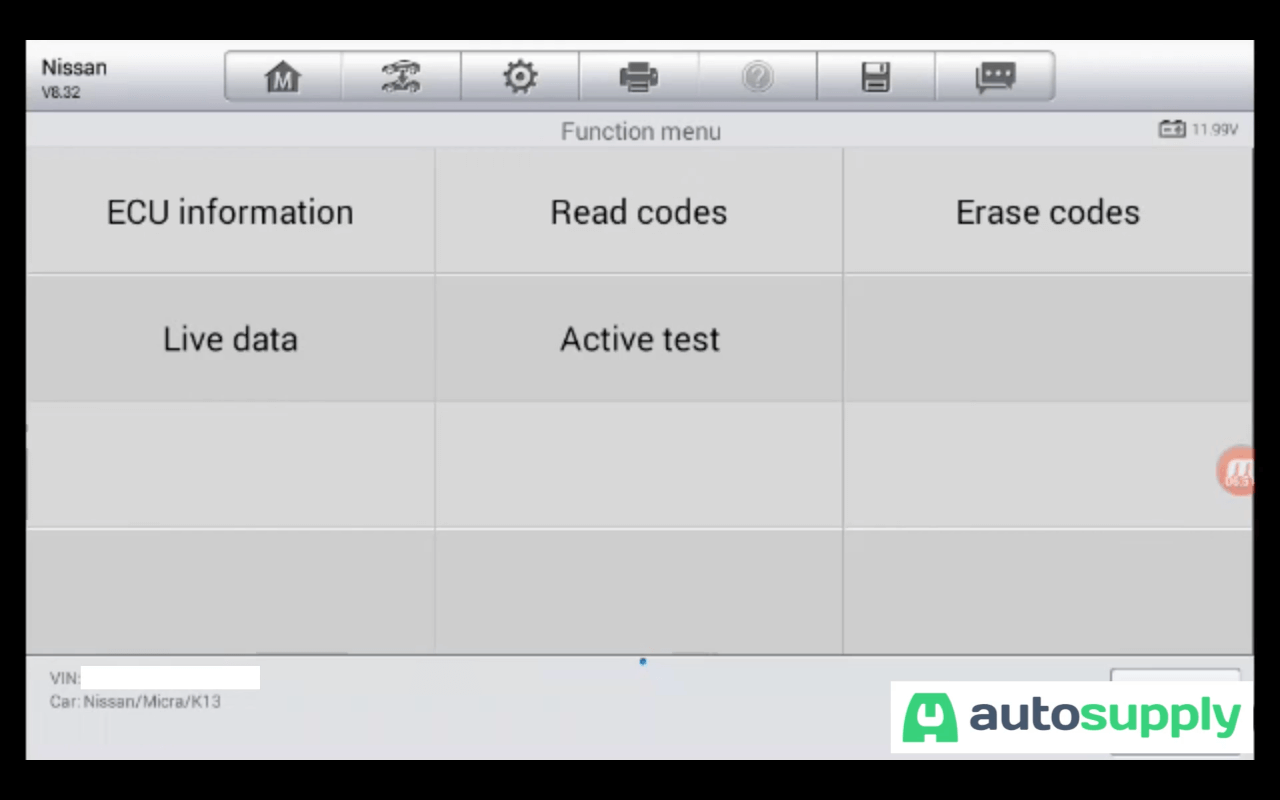
Select engine, the software will then begin to automatically scan the module which will lead you to the next page where you are given the following options:
- ECU Information
- Read Codes
- Erase Codes
- Live Data
- Active test
Live data function
Amongst many of its useful functions, the Autel MX808 boasts a special function called “Live Data”. This function enables the machine to retrieve real-time data from the vehicle’s ECU, which allows for deeper and more in-depth diagnostics of the vehicle’s system.
To perform a live data test, first, make sure that your car is safely parked with the gear set in Park or Neutral. Then follow by turning your ignition on and then switching on your car.
While in the diagnosis menu, select “control unit”, and the machine will redirect to the available modules page. Proceed by selecting the module that you would like to test.
In our case we will choose “Engine”, thereafter the software will begin to initialize. The software initialization can take up to a few minutes depending on how fast the vehicle’s computer system is.
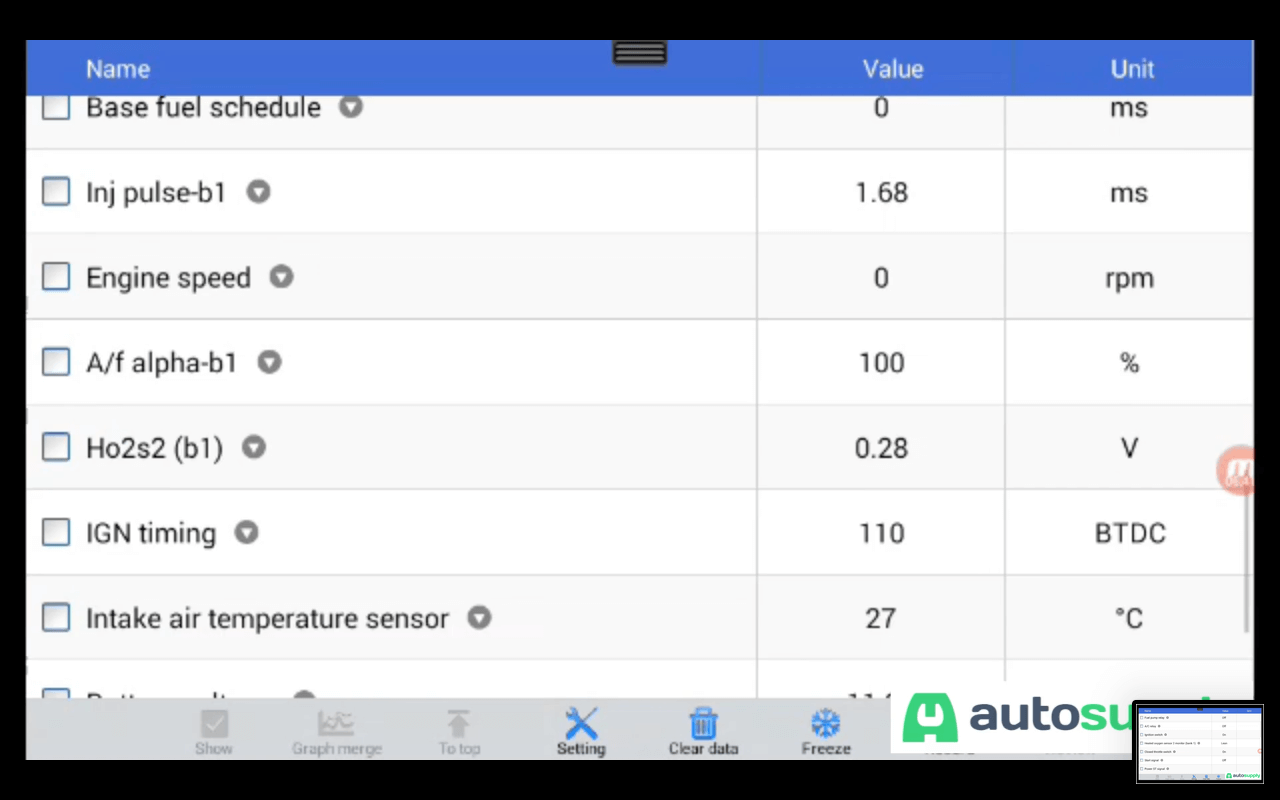
Once the initialization is complete, proceed by selecting “Live data”, depending on the vehicle’s ECU capabilities, you will be given different options. But usually, you will find that there is only one option.
In this case, proceed by selecting “Main signals” and you will be able to see any live data that is available for the vehicle. The amount of data depends on the number of sensors available on the vehicle, the more sensors a vehicle has, the more data available there will be.
Some of the live data that you will see on the MX808 are throttle position, engine speed, coolant temperature, oil level, idle speed as well as the oxygen sensor information.
Be sure to check out our wide range of Autel products
We hope that this article has been insightful and has provided you with enough information on how to perform a full system diagnostic along with other notable features of the Autel MX808.
If you enjoyed this article, make sure to subscribe to our newsletter to stay updated on our latest blogs as well as our latest product additions and deals.
Also, subscribe to our YouTube channel to watch our tutorial videos and stay updated on our latest posts.
We at autosupply have a wide range of car diagnostic tools, as well as other car-related products, make sure to visit autosupply.co.za to browse through our product range.
FAQs
Q/ How to update the Autel MX808
A/ The Autel MaxiCheck MX808 can be updated online, after purchasing your update through autosupply, please follow this link for more information.
Q/ How much does the Autel MX808 cost?
A/ The Autel MX808 is an affordable and powerful all-system vehicle scanner priced between R9 000-R12 000, (IL) check out the current prices and deals here

